前言

仅为记录一些内核重要结构的知识点,系统学习还是要靠自己

以下知识点皆基于linux-4.5

内核进程栈

这个想必大家已经很熟悉了,我就记录一点零碎的知识点

内核栈的大小及构成

内核栈的大小由thread_union决定

1
2
3
4
union thread_union {
struct thread_info thread_info;
unsigned long stack[THREAD_SIZE/sizeof(long)];
};

由于这是一个union类型的结构,所以重要的线程描述符thread_info结构体必然位于每一个进程栈的栈顶

也同样是由于是union类型,所以内核栈大小取决于stack的大小,而这又取决于THREAD_SIZE的大小,这同样是一个很重要的宏,在x86_64的机器上,定义于arch/x86/include/asm/page_64_types.h

1
2
3
4
5
6
7
8
9
#ifdef CONFIG_KASAN // 在boot阶段就unset了CONFIG_KASAN宏,所以KASAN_STACK_ORDER取0
#define KASAN_STACK_ORDER 1
#else
#define KASAN_STACK_ORDER 0
#endif

#define THREAD_SIZE_ORDER (2 + KASAN_STACK_ORDER)
#define THREAD_SIZE (PAGE_SIZE << THREAD_SIZE_ORDER) // PAGE_SIZE为0x1000
#define CURRENT_MASK (~(THREAD_SIZE - 1))

计算得到THREAD_SIZE = 0x1000 << 2 = 0x4000

此值在内核编译时就完成,编译完成后即不可修改,并且内核栈一定是严格对齐其大小,换句话说,知道任意一个进程栈的指针,进行如下运算

fp & ~(0x4000-1) = &thread_info

就可以得到thread_info结构体的地址

这里要注意一点,就是内核栈总大小虽然为0x4000,但是,rsp所能指向的区域范围却小于0x4000,原因在下面这张图中可以看出(图中current指针有误)
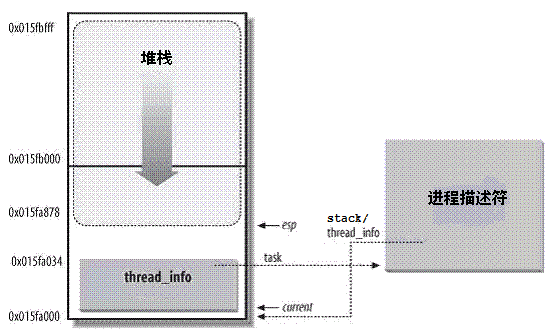
kernel_stack

在这张图的基础上,可以得知以下3点

  1. rsp寄存器是CPU栈指针,用来存放栈顶单元的地址。在80x86系统中,栈起始于顶端,并朝着这个内存区开始的方向增长。从用户态刚切换到内核态以后,进程的内核栈总是空的。因此,rsp寄存器指向这个栈的顶端。一旦数据写入堆栈,rsp的值就递减
  2. thread_info和内核栈虽然共用了thread_union结构, 但是thread_info大小固定, 存储在联合体的开始部分, 而内核栈由高地址向低地址扩展, 当内核栈的栈顶到达thread_info的存储空间时, 则会发生栈溢出,这也是为什么rsp所能移动的范围小于0x4000
  3. 进程task_struct中的stack指针指向了进程的thread_union(或者thread_info)的地址, 在早期的内核中这个指针用struct thread_info *thread_info来表示, 但是新的内核中用了一个更浅显的名字void *stack, 即内核栈

PS: 在最新的内核上(当前为5.11),thread_union结构体已经有很大变化,关键的task_struct指针成员将不再保存在栈上,而是作为一个per_cpu变量储存在.data..percpu段上,这个段的基地址将会被保存在fs寄存器(64位)中,所以类似CVE-2017-16995的漏洞利用方式将会失效

Current

Current宏也算是内核中最为重要的宏之一,其是一个全局指针,指向caller进程的task_struct结构体

来看看他的实现

1
2
3
4
5
6
#define	current	get_current()
......
static inline struct task_struct *get_current(void)
{
return(current_thread_info()->task);
}

可以看出实际上是调用了get_current函数,来看看current_thread_info的实现细节

1
2
3
4
5
6
7
8
9
10
11
12
13
14
static inline struct thread_info *current_thread_info(void)
{
return (struct thread_info *)(current_top_of_stack() - THREAD_SIZE); // THREAD_SIZE为0x4000
}
......
static inline unsigned long current_top_of_stack(void)
{
#ifdef CONFIG_X86_64
return this_cpu_read_stable(cpu_tss.x86_tss.sp0);
#else
/* sp0 on x86_32 is special in and around vm86 mode. */
return this_cpu_read_stable(cpu_current_top_of_stack);
#endif
}

可以看到,是通过读cpu_tss.x86_tss.sp0来获得此时cpu正在处理的进程(即caller)相对应的内核栈信息

可以看看cpu_tss.x86_tss.sp0是如何实现的

1
2
3
4
5
6
7
8
9
10
11
12
13
14
15
16
17
18
19
20
21
22
23
24
25
26
27
/*
* per-CPU TSS segments. Threads are completely 'soft' on Linux,
* no more per-task TSS's. The TSS size is kept cacheline-aligned
* so they are allowed to end up in the .data..cacheline_aligned
* section. Since TSS's are completely CPU-local, we want them
* on exact cacheline boundaries, to eliminate cacheline ping-pong.
*/
__visible DEFINE_PER_CPU_SHARED_ALIGNED(struct tss_struct, cpu_tss) = {
.x86_tss = {
.sp0 = TOP_OF_INIT_STACK,
#ifdef CONFIG_X86_32
.ss0 = __KERNEL_DS,
.ss1 = __KERNEL_CS,
.io_bitmap_base = INVALID_IO_BITMAP_OFFSET,
#endif
},
#ifdef CONFIG_X86_32
/*
* Note that the .io_bitmap member must be extra-big. This is because
* the CPU will access an additional byte beyond the end of the IO
* permission bitmap. The extra byte must be all 1 bits, and must
* be within the limit.
*/
.io_bitmap = { [0 ... IO_BITMAP_LONGS] = ~0 },
#endif
};
EXPORT_PER_CPU_SYMBOL(cpu_tss);

接着看看TOP_OF_INIT_STACK宏是如何实现的

1
2
#define TOP_OF_INIT_STACK ((unsigned long)&init_stack + sizeof(init_stack) - \
TOP_OF_KERNEL_STACK_PADDING
1
2
3

```c
#define init_stack (init_thread_union.stack)

看到这儿,也就大概明白了,如果大家还记得上一个小节说到的thread_union结构体,那么就很好理解了

所以实际上TOP_OF_INIT_STACK宏就相当于cpu正在处理的进程的内核栈起始地址(不是rsp,而是thread_union结构体的首地址) + 栈大小(0x4000)

那么又由于esp0就等于TOP_OF_INIT_STACK,我们把值带回current_thread_info函数看看,可以得到current_thread_info函数的返回值就是cpu正在处理的进程的thread_union结构体的首地址

进一步回带get_current函数,就可以很轻松地推出其返回值为cpu正在处理的进程的task_struct结构体的首地址,也就是current的值

那么简单来说,内核可以通过明确知道正在发出请求的caller进程对应的task_struct结构体在何处,而且由于我们之前讲到过,task_struct结构体中的stack成员指向thread_union(也即内核栈起始地址),所以,通过current宏,内核就可以获得所有必要的信息来对caller所请求的操作做出响应

xID

这部分可能不太能归类为内核方面的知识,不过同样很重要,也是怕自己搞混,所以整理一下权当记录

在提权的过程中,我们找到了thread_union结构体的地址,读取了指向task_struct结构体的指针值,并借此找到了task_structcred结构体成员的地址,最后利用cred成员的地址找到了对应的uid&&guid的地址,写入代表root的0,完成提权

可以看到cred结构体如下

1
2
3
4
5
6
7
8
9
10
11
12
13
14
15
16
17
18
19
20
21
22
23
24
25
26
27
28
29
30
31
32
33
34
35
36
37
38
39
struct cred {
atomic_t usage;
#ifdef CONFIG_DEBUG_CREDENTIALS
atomic_t subscribers; /* number of processes subscribed */
void *put_addr;
unsigned magic;
#define CRED_MAGIC 0x43736564
#define CRED_MAGIC_DEAD 0x44656144
#endif
kuid_t uid; /* real UID of the task */
kgid_t gid; /* real GID of the task */
kuid_t suid; /* saved UID of the task */
kgid_t sgid; /* saved GID of the task */
kuid_t euid; /* effective UID of the task */
kgid_t egid; /* effective GID of the task */
kuid_t fsuid; /* UID for VFS ops */
kgid_t fsgid; /* GID for VFS ops */
unsigned securebits; /* SUID-less security management */
kernel_cap_t cap_inheritable; /* caps our children can inherit */
kernel_cap_t cap_permitted; /* caps we're permitted */
kernel_cap_t cap_effective; /* caps we can actually use */
kernel_cap_t cap_bset; /* capability bounding set */
kernel_cap_t cap_ambient; /* Ambient capability set */
#ifdef CONFIG_KEYS
unsigned char jit_keyring; /* default keyring to attach requested
* keys to */
struct key __rcu *session_keyring; /* keyring inherited over fork */
struct key *process_keyring; /* keyring private to this process */
struct key *thread_keyring; /* keyring private to this thread */
struct key *request_key_auth; /* assumed request_key authority */
#endif
#ifdef CONFIG_SECURITY
void *security; /* subjective LSM security */
#endif
struct user_struct *user; /* real user ID subscription */
struct user_namespace *user_ns; /* user_ns the caps and keyrings are relative to. */
struct group_info *group_info; /* supplementary groups for euid/fsgid */
struct rcu_head rcu; /* RCU deletion hook */
};

可以看到有许多的xid,那么我就来总结一下uidgidsuidsgideuidegid的区别

首先是uidgid

uidgid在用户登录时就被决定,在整个登陆期间几乎是不会改变的,这两个值代表了正在执行操作的用户是谁

接着是euidegid

euidegid在一般情况下和uidgid一致,即uid=euid,gid=egid

但是,当程序被设置suid或者sgid后,情况就不一样了

如果一个可执行程序被设置了suid,那么,在执行程序时,euidegid将会有所不同

打个比方

假设kevin用户的uid和gid分别为204和202,foo用户的uid和gid为 200,201

如果普通文件myfile是属于foo用户的,是可执行的,现在没设SUID位,ls命令显示如-rwxr-xr-x 1 foo staff 7734 Apr 05 17:07 myfile

那么任何用户都可以执行这个程序

此时kevin执行此程序时,程序的cred结构体中,uid=euid=204,gid=egid=202

而如果被设置了suid,也即ls命令显示如下-rwsr-xr-x 1 foo staff 7734 Apr 05 17:07 myfile

那么,当kevin执行此程序时,uid=204,gid=202,euid=200,egid=201

也就是说,此时kevin执行的这个程序具有它的属主foo的资源访问权限

在内核的角度来看,一个进程能否访问资源是基于此进程的euidegid,所以如果myfile程序能够读文件,那么kevin就可以使用myfile程序读取任意属于foo的文件

再举一个sgid的例子

UNIX系统有一个/dev/kmem的设备文件,是一个字符设备文件,里面存储了核心程序要访问的数据,包括用户的口令。所以这个文件不能给一般的用户读写,权限设为:cr--r----- 1 root system 2, 1 May 25 1998 kmem

但ps等程序要读这个文件,而ps的权限设置如下:

-r-xr-sr-x 1 bin system 59346 Apr 05 1998 ps

这是一个设置了SGID的程序,而ps的用户是bin,不是root,所以不能设置SUID来访问kmem,但要注意的是,bin和root都属于 system组,而且ps设置了SGID,一般用户执行ps,就会获得system组用户的权限,而文件kmem的同组用户的权限是可读,所以一般用户执行ps就没问题了

最后回到提权的问题上来,在我们修改了uidgideuidegid后,我们执行了system函数,新被fork出来的进程将会继承父进程的cred结构体,子进程的real_cred结构体将被赋值为我们修改的cred结构体,故而提供了一个root shell

后记

还需要研究一下cap_bprm_set_creds函数,这是execve重新设置fork后的子进程的uid&&gid&&各种id的关键函数

另外还有一些重要的类似dentry,inode也会在后面记录一些重点